Showing posts with label How to Guide. Show all posts

How to Blanch Almonds

How to Blanch Almonds
Turning raw almonds into blanched almonds is easy peasy.

Blanching Almonds

Boil some water (saucepan, kettle, microwave, etc.), enough to cover your almonds.

Place your almonds in a heat proof bowl and pour boiling water over them. Cover with a plate or lid and let it sit for 1 minute only, any longer and your almonds will get soggy.

Drain them in a sieve and run them under cold water and drain again. Do not let the almonds sit in water. Then use your fingers and squeeze them out of their skins. The skins will have separated off the nut and will come off very easily. Be careful of the almonds shoot out of your fingers and onto the kitchen floor.

Dry the almonds on a paper towel then bake them at 325 degrees Fahrenheit for 5 to 10 minutes.

Flaky Pate Sucree

Flaky Pate Sucree
Pate sucree is one of the three basic French pastry crusts (pate brisee - the all purpose crust used for pies, savory and sweet tarts, pate sucree - a sweet crust used for tarts, and pate sablee - the sandy crumbly crust). It is sweeter than the all purpose pie crust, the pate brisee, however the texture can vary. Some recipes call for creaming the butter and sugar then adding the flour, resulting in a crumbly, shortbread cookie-like crust. Whereas other recipes diverge and call for processing or cutting the butter into the flour sugar mixture, which is the same method used to create a pate brisee. This recipe uses the latter technique and yields a sweet, flaky, melt-in-your-mouth crust that is unbelievably good. I'll try the creaming the butter and flour for the next tart but I have a feeling I will be coming back to this recipe again and again.

Prebaked Flaky Pate Sucree
for an 8 or 9 inch pan

1 C flour
1/3 C confectioner's sugar
1/4 tsp salt
6 Tbsp cold butter, cut into 6 pieces
1 egg yolk
2 Tbsp cold milk or ice water
1/2 tsp of vanilla

Add the flour, confectioner's sugar, and salt together in a food processor and pulse once or twice to combined. Add the pieces of butter and pulse until the butter pieces are no bigger than a pea. Alternatively use a fork or pastry cutter to cut in the butter, or freeze the butter and coarsely grate it then use your fingers and rub the pieces into the flour. It is very important to keep the butter cold otherwise it will melt and make the crust greasy and you'll lose all the flaky layers.

Mix the egg yolk, milk, and vanilla together. Drizzle the mixture over the butter and flour mix in the food processor. Pulse again until the dough start to form large clumps. If it looks too dry add a little more milk.

Scrape the dough onto a large piece of plastic wrap and press the clumps together to form a disc. Wrap the dough in the plastic wrap and chill at least an hour up to overnight. Or store it in the freezer for as long as you want.

Preheat the oven to 375 degrees F.

Lightly flour a work surface and rolling pin and roll out the dough to into a large circle. Move the crust around often to make sure it doesn't stick to your work surface.

Transfer the dough to an 8 or 9 inch tart pan. To make this easier, drape the dough over the rolling pin and lay it over the pan. Lift the edges of the crust and gently press the dough down into the pan. Roll over the top of the pan with a rolling pin to trim any overhanging dough.

Prick the surface of the dough with a fork. Press a sheet of aluminum foil onto a crust and add pie weights, beans, or clean pennies on top. I like using pennies because they are the best heat conductor. Bake on the middle rack for 25 minutes. Remove the foil and baking weights (be careful the weights will be very hot!) and return the crust to the oven to bake for another 10 or so minutes until it is golden. Cool to room temperature before filling.
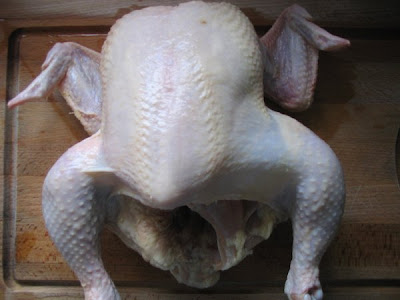
How to Cut Up A Whole Chicken

There are a few benefits to cutting up a whole chicken yourself as opposed to buying the parts separately. You can save some money since whole chickens cost less, you have better control over how your chicken is butchered, and the scraps can be kept for chicken stock. To do this, you’ll need a large cutting board with a gutter for the juices, a sharp chef’s knife, and a pair of kitchen shears. For further deboning (for example for deboning a chicken breast) a boning knife gives you more control and maneuverability. With a bit of practice, a whole chicken can be done in less than 5 minutes, but always be careful!

Disclaimer: This guide contains multiple pictures of chickens and chicken parts, so if you are uncomfortable with seeing this, please don't read the rest of the guide.

Wash the chicken and remove the giblets. Save the neck for stock.


Lay the chicken breast up on your cutting board with wings closest to you (the above picture the wings are away from me so I turned the chicken 180 degrees). To separate the wings, cut a little bit into the breast to expose the wing joint. Here in the picture you can see the wing joint.


Once you can see the wing joint, pull the wing back so you expose more of the joint and see better. Then cut through the joint.


Repeat for other wing and now you have 2 whole wings. Cut the wingtip off and reserve for stock.


Cut through the second joint to separate the wingette and drummette. You can save these for buffalo wings or other dishes.


The legs are attached to the body of the chicken only by the leg joint and some skin and connective tissue. Sometimes the body is already starting to separate from the legs so just cut through the skin. The red circled area highlights where you should cut on the skin. You can see on my chicken the legs are already very separated from the body.


Once you cut through the skin, pry the leg away from the body.


Then bend the leg back to pop out the leg joint.


Cut through this joint but cut as close to the backbone as possible, you don't want to lose the tasty thigh meat, and now you have a leg quarter. Repeat for the other leg.


Flip the leg quarter over, skin side down. You’ll notice a line of fat, this line separates the drumstick from the thigh. Cut down to expose the joint, then cut through the joint and now you have a drumstick and thigh. Repeat for the other leg.


Now turn the chicken over, breast side down.


Using kitchen shears, cut out the backbone. Kitchen shears are much safer for this than a knife because a knife can slip. Save the back bone with the neck and wing tips for stock.


Now you have a bone in chicken breast. Skin side down, cut the breast in half for 2 chicken breasts. You can use a cleaver or a chef’s knife. You’ll need to cut through some bone; this is the most difficult part, so be careful! Now you have 2 bone in, skin on chicken breasts.


(my camera ran out of batteries here)

For further boning, use a small boning knife and make cuts as close to the breastbone as possible to debone the chicken breasts. Remove the skin and now you have 2 boneless skinless chicken breasts.

*a note about chicken breasts: There is a smaller muscle that is attached to the chicken breast, the tenderloin muscle. Sometimes this part tends to fall off from the rest of the breast. This is okay, for example when you're preparing chicken cutlets it's best to remove this piece and save it for stir fry or something else because it usually comes off when you pound the chicken breast.

After you are done cutting up the chicken, wash your cutting board and all other equipment with hot soapy water, then disinfect it with a solution of dilute bleach. This is the best way to kill all the bacteria.

Links:
Cutting up whole chicken at Cooking for Engineers.

How to Make Sushi Rice

How to Make Sushi Rice
To make sushi you must start by making sushi rice. You must use sushi or short grain rice, preferably Japanese rice; long grain rice cannot be used. The most consistent and convenient way to cook rice is to use a rice cooker, but not everyone has one so rice can also be cooked in a saucepan on the stove top. A rice paddle is efficeint for stirring the rice but a spatula can be used also.

Sushi Rice
2 C short grain rice
2 C water
1/4 C rice vinegar
2 Tbsp sugar
1/2 tsp salt

Rinse rice 3 to 5 times and drain in a sieve. Some recipes say to rinse until the water runs clear but I find this excessive and unneccessary.

Add rice and water to rice cooker or saucepan. Saucepan cooking instructions: Bring the rice to a boil over high heat. Then reduce to a simmer for 15 minutes (do not open). Remove from heat and let it rest covered (do not open, the rice is still cooking) for another 10 minutes. Meanwhile, stir sugar and salt with the rice vinegar to dissolve; you can microwave the solution for 20 - 30 seconds to help it dissolve faster.

After the rice has rested, pour the rice vinegar solution over cooked rice. Use a paddle or spatula to fold the rice and evenly coat the grains with the vinegar. Be careful to not smush the grains.

Let the rice cool to body temperature. Sushi rice is easiest to work with when it is still warm. To speed up the cooling process, you can fan the rice as you fold.

Now you can use the rice to make maki rolls or nigiri.

Yields 4 cups of cooked rice. I find that this is enough for 6 maki rolls, using about 2/3 C of rice per sheet.

Links:
Sushi rice at Coconut & Lime

Cast Iron Guide

Being a former college student, my kitchen is rather sparse. Of the four pans I own, a 10 in cast iron skillet is one of them and I simply adore it. It's virtually nonstick and is excellent at retaining heat. It makes an amazing steak, perfect southern cornbread, and is my go-to bacon pan. Anything smaller than a 10 in is not very functional and anything larger than a 12 in is just too heavy. With proper seasoning, a cast iron skillet becomes nonstick after time and iron is an excellent heat conductor. However, they are rather heavy and it takes time to develop a seasoned surface. This will be a guide on how to season and take care of cast iron cookware.

Scrub a new unseasoned skillet with steel wool or a wire brush to removed the protective wax coating then wash with mild, soapy water. Avoid using soapy water on the pan after this.

A preseasoned pan should also be seasoned before use. Do not wash with soapy water, instead use a stiff brush and scrub the inside under very hot water. Then dry the pan on the stovetop.

Use a paper towel to rub the skillet with lard, Crisco, or bacon fat. It is best not to use a liquid oil like vegetable oil because it leaves a gummy residue and goes rancid faster. Do not use olive oil or butter because they will smoke and burn very quickly.

Put the greased skillet upside down in a 350ºF oven (this way the fat doesn't pool at the bottom) for about an hour. Put a sheet of aluminum foil on a rack below the skillet so excess fat can drip onto the foil.

Let cool before use.

Note:
Avoid cooking wet or acidic foods, like tomatoes, in a cast iron because it will slowly dissolve the seasoning.

After cooking, do not wash cast iron with soapy water. The soap will ruin the seasoning and the taste will absorb into the porous iron and impart a soapy taste to food.

If there is food stuck to the pan, pour some kosher salt into the pan and use it to scrub away the food particles.

Always dry the pan throroughly before storing because water will cause the iron to rust. The most effective way to dry the pan is heat it on the stove top. Paper towels and dish towels may be used but it might leave fibers on the pan.

If the pan begins to rust, use steel wool or a wire brush to scrub it off and reseason.

I love to cook bacon in my cast iron because as the bacon cooks, the pan gets seasoned at the same time.

Poached Egg Trick

Poached Egg Trick
I had the most beautiful poached duck egg at Campagne. The yolk was completely encapsulated in a delicate white orb. This method for poaching eggs produces a morespherical egg rather than a flat poached egg.

What you'll need is a pot of simmering water, an egg, a small cup or bowl, and microwavable plastic wrap.

Bring water to a boil then reduce to a simmer. Use a small bowl or cup and push a piece of plastic wrap into the cup.

Crack an egg into the plastic wrap and tie the top with a small strip of plastic wrap or a piece of twine.

Gently lower the egg into simmering water.

Poach in simmering water uncovered: 3 minutes for runny yolks, 4 minutes for slightly firm runny yolks.

Use a fork or tongs to fish out the egg and gently slide the egg out of the plastic wrap.

I was a little hesitant about using the plastic wrap but it did not melt so it seems fine to me. One way to minimize the time the egg spends in plastic wrap is once the white has solidified enough, you can cut the plastic wrap and slip the egg out into the water but I haven't tried this. If you have health concerns, there are other ways to poach an egg.

Elise has another poached egg trick on her blog Simply Recipes.