Showing posts with label cookies. Show all posts

Chocolate Shortbread Thumbprint Cookies


Is everyone getting ready for Christmas? How are those sweet treats treating you? 
Tis' the season for all things naughty. Shortbread has been running rampant in this loft of mine. Needless to say everyone from my doorman, my husbands office, the local homeless, to my yoga instructor has been given goodies. I can't eat them all or I would look like a blimp. These are my second favorite cookie. My first being the Salted Caramel Shortbread Cups I gave you earlier this week. 

When my husbands co-workers tasted these, one said: "Your wife is evil and she must be stopped". That is right. They are sinful. I dare you to take a bite! 
This recipe will yield about 1 dozen cookies. Perfect for you, your love, and a few friends.

Chocolate Shortbread Thumbprint Cookies
adapted from Cherished Bliss
1/2 cup plus 1 tablespoon of butter, softened
1/3 cup sugar
1/4 cup cocoa powder
1/2 teaspoon vanilla
1 cup flour
1/4 teaspoon salt
1/4 teaspoon baking soda
1/2 teaspoon baking powder
for frosting:
2 tablespoons cocoa powder
1/2 heaping cup powdered sugar
2 tablespoons hot water
1/2 teaspoon vanilla

Preheat the oven to 350 degrees F. 
Cream the butter and the sugar until smooth. 

Add the cocoa powder, vanilla extract, and mix until incorporated.

In a separate bowl, combine the flour, salt, baking soda, and baking powder. 
Add to the butter mixture and mix until just combined. 
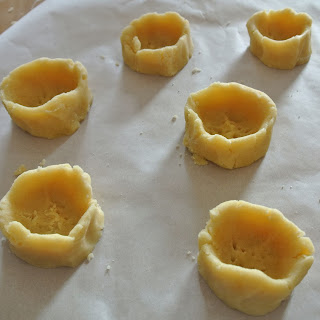
Roll into balls 
and make an indent with your thumb in the center of the ball. Bake for 7-9 minutes or until dry looking and lightly cracked on the surface but still very soft.
When they come out of the oven, press the centers down again to make a more defined well for the frosting. Allow to cool.
Whisk the cocoa powder, powdered sugar, hot water, and vanilla. Spoon the frosting into the centers of the cookies and add sprinkles. Allow frosting to set before storing in tins.

Salted Caramel Shortbread Cups


My man LOVES caramel. I like it, but he loves it. I know that if I want to let him know he is special to me, all I have to do is cook him up something new with caramel. Add a little sea salt, and he gets all sorts of excited! 

These little cups of salted caramel are heaven. 
You can always use a cutter and make them look perfect, but I like the rustic look. I love giving cookies and treats that look like they came from home, because they did! Enjoy!


Salted Caramel Shortbread Cups
by Christi Silbaugh

for the shortbread:
10 tbsp unsalted butter, at room temperature
1/2 cup sugar
1/2 tsp salt
1 egg yolk
1 2/3 cups flour

for the caramel:
1 cup unsalted butter
1 cup light brown sugar
3/4 cup light corn syrup
2 tsp sea salt
4 tbsp sugar
4 tbsp heavy cream
1 1/2 tsp vanilla extract

Sea salt flakes

Line a baking stone or baking sheet with parchment paper.

In a large bowl, combine the butter, sugar, and salt with a pastry cutter or fork. Add the egg yolk and continue mixing until it has a damp sand consistency.
Add the flour and use your hands to combine the dough until you can start to form shapes with it. 
Form cups with your hands. 
Refrigerate for 30 minutes. 
Preheat oven to 350 degrees.
Use a fork to make little holes in the bottom of the chilled shortbread cups. This will help keep it from breaking and flaking apart. 
Bake for 25 minutes. Set aside to cool.
For the caramel, combine the butter, brown sugar, corn syrup, salt, sugar, and heavy cream. Bring to a boil and stir for about 5-10 minutes until caramel reaches the “soft ball stage” at around 230 degrees.
Remove from heat, stir in the vanilla and pour caramel in the shortbread cups. Sprinkle with sea salt flakes and serve!

Dark Chocolate Chip Cookies


Love, Romance, and Chocolate go together. Nowadays, scientists ascribe the aphrodisiac qualities of chocolate,to two chemicals it contains. One, tryptophan, is a building block of serotonin, a brain chemical involved in sexual arousal. The other, phenylethylamine, a stimulant related to amphetamine, is released in the brain when people fall in love. The darker the chocolate, the more of these magic chemicals it contains. 

So when I set out to make some crunchy chocolate chip cookies for my man. I used enjoy life foods dark chocolate chips
Their Dark Chocolate Morsels are dairy, soy and gluten-free, but you would never know it. So rich, creamy, and scrumptious! Just because they are good for you, doesn't mean they are lacking in taste. I highly recommend them. They made these cookies irresistible. 


Dark Chocolate Chip Cookies
makes 1 dozen
8 1/2 ounces organic unbleached white flour (about 1 1/2 cups)
1//2 teaspoon baking soda
3/4 teaspoon baking powder
3/4 teaspoon s sea salt
1/2 cup (5 ounces) unsalted butter, at room temperature
1/2 cup (5 ounces) light brown sugar
1/2 cup  (4 ounces) granulated sugar
1 egg
1 teaspoon vanilla extract

Sift together the flour, baking soda, baking powder and salt into a large bowl and set aside.

Cream together the butter and sugars on medium speed until very light. Add the eggs one at a time, mixing well after each addition, then add the vanilla. Reduce the mixer speed to low, gradually add the dry ingredients and mix until just combined. Using a rubber spatula, fold in the chocolate chips.

Press plastic wrap against the dough and roll it up. Refrigerate for at least 3 hours, up to 72 hours. If you are in a hurry, you can freeze the dough for 1 hour. 
When ready to bake, preheat oven to 350 degrees F. Line a baking sheet with parchment paper or a nonstick baking mat.

Slice the dough into cookie shape and place on your baking sheet or stone leaving plenty of space in between each cookie. 

Bake until golden brown but still soft, 15 to 18 minutes. 
Transfer the cookies to a wire rack for 10 minutes,  until just warm or at room temperature. Repeat with remaining dough (or keep some of the dough refrigerated for up to 3 days, and bake cookies at a later time). Store leftover cookies in an airtight container at room temperature for up to 3 days.

Tim Tam Slam

Tim Tam Slam

A while back, I was asked if I’d be willing to review Pepperidge Farm’s newly released Tim Tam cookies. A Tim Tam is a sandwich cookie with 2 light and crisp chocolate wafers, chocolate cream filling, and completely covered in chocolate. They're Australia's favorite cookie and haven't been available in the States, until now! I agreed to review them because I've always wanted to try these cookies and do the famous Tim Tam Slam. (And turning down triple chocolatey cookies? I do no such things.) However, I never got the logistics of how to do a Tim Tam Slam - I knew it was something about biting the ends off a cookie and using it as a straw for a hot beverage. Sounds cool. So I looked it up on Youtube, and whadoyaknow, I found a video of Natalie Imbruglia teaching a talk show host how to do a Tim Tam Slam. Perfect! Gotta love the internet.

Tim Tam Slam
The next morning I made a cup of strong Vietnamese coffee (I looove Trung Nguyen) and black tea and Steven and I did some Tim Tam Slams for breakfast.

Tim Tam Slam
First you bite a little corner of the cookies diagonally like so. Then you dip the cookie in the beverage and suck until you can feel the drink in your mouth and quickly eat the whole cookie. Don’t try to bite the cookie in half (I made this mistake) because it will squirt and fall apart so just eat the whole thing in one big bite. And you have to do this quickly otherwise the chocolate coating will melt and the cookie will fall apart as you're holding it.

I think it’s traditional to do the slam with tea but being partial to coffee myself, I much preferred the combination of strong coffee and chocolate. I also tried it with some cold milk because I thought cookies and milk was always a delicious combo but not in this case. The cold milk made the chocolate exterior cold and waxy and the cookie just didn’t taste right filled with cold milk - pretty gross actually. A hot beverage is definitely the way to go because the chocolate shell gets gooey and the insides are warm and melty. Mmm...! I really liked the caramel center in the caramel Tim Tam but the chewiness distracted from the overall soft gooey interior when you're doing the Tim Tam Slam, whereas the chocolate cream variety resulted in a uniformly soft and gooey cookie.

My conclusion? The Tim Tam Slam is a transcendent experience that everyone needs to experience. I would definitely urge people to try both kinds and see which you prefer. The only downside? Two cookies are 25% of your daily saturated fat! Ouch! I dunno what kind of magical ingredients they put in these to make them so damn tasty but it ain’t good for you that’s for sure. Another bummer is that these cookies are only available for a limited time in Target. You can get a $1 off coupon at http://www.ilovetimtamcookies.com/index.html. You need to do a Tim Tam Slam ASAP, you'll be glad you did.

Tim Tams

Disclaimer and other ramblings:
While I love these cookies, they're a bit pricey. My local Target carries them for $3.34 for a 7oz. box. I think I will still get a few more boxes for the occasional treat because they are tasty. Now as for the other Pepperidge Farm stuff, I only buy Pirouettes, which are my favorite holiday treat. Pepperidge Farm stuff overall is usually on the expensive side. I've heard that Milanos are noticeably smaller nowadays, which is very disappointing, but I guess what brand hasn't been cutting back on costs with the economy being like this. Pirouettes are tasty except the Cappuccino flavor, which is horrendously disgusting. Being a coffee lover, I was obviously drawn to this flavor. I made the mistake of getting two tins and I hate them. They taste overwhelmingly of cinnamon and when I looked at the ingredient list, cinnamon shows up before coffee flavoring! I have never ever put cinnamon in my coffee, and I wonder who does?! Ugh, so gross!

Oatmeal Power Bars

The snow is all fun and games until you realize there's 8 inches of it to shovel out of the driveway. While Steven painstakingly cleared the driveway, I made myself useful by building a snowman. Standing at a majestic 4 foot something tall, he's the greatest snowman I've ever made.

Season's Greetings
My favorite part is his nose, which is a giant icicle instead of the usual carrot. Gives him the same sort of look, except 10x cooler (wow that was sooo unintended... gotta love crappy cold weather puns).

After the last few days of playing in the snow, I realized I've fallen ridiculously behind on making all of my holiday food items. I was supposed to get my 12 days of cookies done by tomorrow but right now, it's not looking good (6 cookies posted and 2 days to go?). But a friend said Christmas isn't just a day, it's a whole season that goes until January. I guess it's true, it's not like the holiday baking stops after Christmas. In the spirit of holiday baking I'll keep these cookies coming at my unreliable sporadic pace.

I just finished making my last official present last night (which I will post about later because the recipient reads this blog). Now I have a crapton of other things to make for Christmas, that is, if the car can make it out of the driveway. On the list: hot chocolate mix, marshmallows, aebleskiver mix, stollen with candied orange peel and rum raisins (soaking in rum right now), and chocolate chip cookies for the neighbors that lent us their snow shovel.

These oatmeal power bars are supposed to be a homemade imitation of these Costco oatmeal bars that Steven's dad likes so much. Last time I was at their house, I briefly glanced at the mile-long ingredient list for the bars - butter, oil, oats, brown sugar, coconut, nuts, dried fruit, and flax are the few I could remember. I bought a bag of ground flax seed from Trader Joe's for the sole purpose of trying to recreate the bars. Although I knew the majority of the correct ingredients, without the right amounts, I ended up just tossing stuff together. I obviously haven't mastered the skill of remaking food items because my bars were not like the Costco bars, still tasty in their own right, but not the same. Mine were so crumbly, a quarter of the bars disintegrated while I was cutting them and turned into trail mix.

To make them healthier, I could try cutting down on the butter and oil, maybe replacing some of it with applesauce, replace the brown sugar with honey or agave nectar, and up the flax and nuts.

Oatmeal Power Bar
Oatmeal Power Bar
makes 24 bars

1/2 C almonds, toasted
1/2 C pecans, toasted
1 C dried cranberries
1/2 C whole wheat flour
1/4 C ground flax seeds
1 tsp cinnamon
1/2 tsp baking soda
1/4 tsp salt
2 C rolled oats (old-fashioned or quick cooking both work)
1 C sweetened shredded coconut
1/2 C (or 1 stick) unsalted butter at room temperature
1/4 C canola or vegetable oil
1/2 C dark brown sugar
1 large egg
1 tsp vanilla

Preheat the oven to 350 degrees F. Line a 9 x 13 jelly roll pan with parchment paper.

If your almonds and pecans are not toasted, spread them on a baking sheet and toast for 10 - 15 minutes at 350 degrees F, or until the skin has darkened slightly and the nuts smell fragrant. Set aside to cool. After they are cool, chop roughly by hand or pulse them in a food processor.

Pour 1 cup of hot water over the dried cranberries and let them rehydrate for 5 minutes and drain.

Meanwhile, in a bowl, whisk the flour, ground flax, cinnamon, salt, and baking soda together. In another bowl, whisk the rolled oats, coconut, and chopped nuts.

With a stand mixer and paddle attachment or hand mixer, beat the butter until creamy and fluffy. Add the sugar, oil, and vanilla and beat again until creamy and fluffy. Add the egg and beat until the mixture is smooth. Add the flour mixture and beat until evenly combined. Then add the oat mixture and dried cranberries and mix until the dough is evenly incorporated.

Scrape the dough into the lined jelly roll pan and press the dough onto the pan with your fingers. Cover the dough with another piece of parchment and using a small rolling pin or empty wine bottle, roll over the parchment until the dough is evenly packed in the pan. Remove the top piece of parchment. Bake at 350 degrees for 15 - 20 minutes or until the edges are browned, the entire top is golden, and the center of pan is baked. You can use a toothpick to poke the middle to make sure it's not still gooey.

Run a knife along the edge of the pan to loosen the cookie from the pan. When the pan has cooled with room temperature, transfer the entire sheet of cookie to a cutting board (the easiest way to do this is to place the cutting board right next to the pan then use the parchment paper overhang as handles and slide the whole thing onto the board). Cut the sheet in half width-wise, then each half into quarters, and then cut each quarter into 6 bars. You should get 24 bars, give or take a few that will fall apart.