Showing posts with label fast. Show all posts

A Healthier Maple and Brown Sugar Hot Cereal


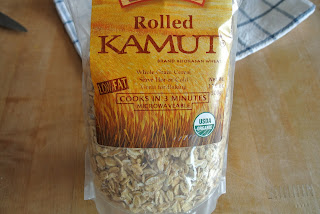
I was really intrigued when I received a parcel that contained a bunch of KAMUT®products to try. The first product that cought my eye was a bag of Rolled KAMUT®.


KAMUT®wheat looks very similar to common wheat. However, its grains are twice the size of modern wheat kernel. I think it looks a lot like oats. 
It is considered a "high energy grain" because it contains more proteins, lipids, amino acids, vitamins and minerals than modern wheat. It is known for its rich nutty flavor. KAMUT®wheat is used similarly as modern wheat. Its grains can be either directly consumed or milled into flour. It can be found in breads, bread mixes, breakfast cereals, cookies, waffles, pancakes, bulgur, backed goods, pastas, drinks, beer and snacks.

The first thing that came to my mind to make is a healthier Maple and Brown Sugar hot cereal. That flavor is loved by us. Once upon a time, I fell for the over processed, high in sugar, virtually no wholesomeness whatsoever, quaker instant oatmeal. Well step aside captain quaker. This cereal is ready in 3 minutes and is very wholesome. 
So how can it be wholesome with brown sugar and maple syrup? Simple. Have you tried organic sucanat? 
Unlike refined and processed white cane sugar and brown cane sugar, Sucanat retains its molasses content. It is essentially pure dried sugar cane juice. Minimal processing produces a much healthier natural sweetener that is much sweeter using a smaller amount. 

Using pure maple syrup also adds to the sweetness of this cereal. Pure maple syrup is wholesome. Producing a lot of sweetness with less sugar than traditional refined sugars and syrups. 


A Healthier Maple and Brown Sugar Hot Cereal
serves 2

2 cups filtered water
1 cup rolled KAMUT®
1/4 tsp sea salt
2 tsp sucanat
2 tsp maple syrup

Bring 2 cups water to a boil. Add the sea salt and KAMUT®and reduce heat to medium while it cooks for 3 minutes. 

After 3 minutes poor your KAMUT®into 2 serving bowls. Top each bowl with 1 tsp sucanat and 1 tsp maple syrup. 

Enjoy!


5 Minute Teriyaki Snapper & Rice


Today I am sharing you a very fast 5 minute meal. I am not usually a big "fast meal" maker. But this week is Thanksgiving, I am in the middle of about 6 jobs and I am very pressed for time. Thanks to Rice n Simple, I got to try out their all-natural, premium cooked rice that raises the standards for instant microwaveable meals. It cooks in just one minute and the various sauces that come with each bowl are exceptionally delicious and can make it look like you have been slaving away in the kitchen all day! 

Rice n Simple is a young company that is dedicated to providing its customers with an option for enhanced energy, flexibility and creativity by offering the highest quality rice in addition to the most deliciously flavored sauces for a healthy lifestyle. Rice n Simple was established on the philosophy that being healthy and eating healthy is essential to living a balanced, simple and harmonious life. The company strives to connect with its customers through one of the simplest things life has to offer, quality food; and with the simplest nutrient rich food in the world, rice.

Available in both white jasmine rice and brown rice, Rice n Simple has created super healthy rice meals with incredible sauces that add mouthwatering taste to its already flavorful rice. And at a very affordable price, Rice n Simple provides quick & easy, yet super healthy rice bowls. The rice itself is of the highest quality, imported from Thailand and selected for its delicious flavor, unique texture and naturally distinctive aroma.

Rice n Simple is available for purchase at select Kroger locations in the US as well as at www.amazon.com for just MSRP $2.49 per 7oz meal. With delicious sauces including naturally brewed Soy Sauce, lush Shiitake Mushroom Glaze and a yummy flavored Teriyaki Glaze, the rice can also be utilized in any recipe, including those listed at www.RicenSimple.com.


For this recipe you only need a few simple ingredients. 

5 Minute Teriyaki Snapper & Rice
serves 2

1 Tbsp. Olive Oil
Rice n Simple jasmine rice with teriyaki glaze
2 6 ounce fillets of wild caught red snapper
Sea Salt and freshly grated pepper to taste. 


Start out with a non stick pan or cast iron skillet, and heat it over medium high heat.

Salt and pepper the snapper on both sides to taste.
Add 1 Tbsp. Olive oil to the hot pan and swirl to coat. 

Add your snapper. Cook for 2 minutes, then flip. 
Cut the Teriyaki glaze sachet and squirt it on the cooked side of the fish, being careful not to get it in the pan. Cook for another 2 minutes. 

While finishing up cooking open your rice containers. 
Remove the film completely and cook on high for 1 minute for each container. 

Serve the fish over rice with your favorite sauteed vegetables. 

Basil Fried Rice

Basil Fried Rice
Basil fried rice and pan fried salted mackerel

I made a lot of fried rice during the school year. That and ramen (I'm very particular about my ramen)were my staples. The only constants for fried rice is leftover rice, which we always have plenty of, and egg. I would argue you need some sort of herb, which most of the time means green onion, in this case basil, but again that's debatable. If I'm feeling particularly fancy, I'll throw in some seafood (Trader Joe's seafood mix is great for this) or veggies, in an attempt to be healthy. But simple is good too, and fried rice doesn't get simpler than this.

Seafood and XO Sauce Fried RiceThe fancy stuff: Seafood and Veggies Fried Rice with XO Sauce

The basil came from my Aerogarden, a nifty hydroponic tabletop garden. It's pretty sweet but really expensive. If I hadn't gotten it as a gift I would have never considered buying one.

It started as this... (week 2)
Aerogarden week 2
aww, so cute!

Grew into this... (week 3)
Aerogarden Week 3
Then I forgot to keep track...

and it turned into this!
Aerogarden Week "I forgot to keep track"
Ahh! (Mint, Basil, Dill, Thyme, Parsley, Purple Basil, and Chives)

It would have been a smarter move to start the Aerogarden in the fall so I could have fresh herbs in the Winter but I wanted to harvest it for E's wedding. I was delusional in thinking that a tabletop garden could produce enough herbs for dinner for 40. I guess I could be growing this stuff outside with all the lovely weather we've been having in Sea-town, but having everything in the kitchen is pretty convenient.

Some herbs are growing better than others. The parsley is pretty slow but the dill and basil plants are growing like crazy and I'm constantly having to prune them. Short of eating the stuff straight, (I'm not that hardcore), I've been adding basil to everything. It worked out pretty nicely in fried rice (I don't think dill would go over as well).

Basil Fried Rice
serves 2

2 C cooked, cold, leftover rice from day before
2 eggs, beaten
1/2 C basil leaves, chopped right before adding to prevent blackening
1/2 tsp kosher salt
Freshly ground black pepper
1 - 2 Tbsp soy sauce (as desired, more soy sauce = browner rice)
1 Tbsp vegetable or canola oil (sometimes I use bacon fat, mmm!)

Heat the cooking oil over medium high heat in a nonstick skillet or wok. Add the rice and cook for 2 - 3 minutes. Break up any clumps of rice and cook until the rice is steamy hot. Add the salt and some pepper.

Push all the rice to one side to clear an area of the skillet. Add the beaten eggs to the open spot in the pan and stir to cook the eggs. When the eggs are almost fully cooked but still runny, stir it into the rice and add the soy sauce.

Take the pan off heat, roughly chop or tear the basil, and stir it into the rice. Add just seasoning with more salt if necessary.

-or- w/ Green Onions instead of Basil
1 to 2 (depending on the size and your preferences) green onions, thinly sliced

Instead of adding the green onions at the end like with the basil, add the green onions to the cooking oil before adding the rice and cook until it's fragrant, about 30 seconds, then add the rice and proceed with the rest of the recipe.

Chicken and Basil Stir Fry

Chicken and Basil Stir Fry

I never understood why so many people like white meat over dark meat. White meat is so bland and boring and ridiculously easy to overcook. Dark meat on the other hand, is succulent and flavorful, nearly impossible to overcook, and actually tastes like chicken. Oh well, to each his own! It works out better for us dark meat lovers anyway because thighs and drumsticks are always cheaper than breasts. But no worries, this stir fry is delicious no matter what kind of chicken you like. Just be more careful about the chicken drying out if you're using a breast or tenderloin cut.

I'm trying to post more student-friendly, easy/quick to cook recipes. Do you guys think a recipe like this would qualify? The ingredient list isn't terribly long and most of them aren't hard to come by. Prep and cook time was maybe 30 minutes?


Chicken and Pepper Stir Fry with Basil

1 pound chicken thighs or breast sliced into strips or slivers
1 large red bell pepper sliced
1 large shallot, thinly sliced
2 cloves garlic, minced
1 tsp grated fresh ginger
1 Tbsp soy sauce
2 Tbsp fish sauce
2 tsp brown sugar
1 - 3 Thai red chilies, seeds removed and thinly sliced or sub some jalapenos(to taste)
1/2 tsp freshly ground black pepper
1 C fresh whole basil leaves (sweet or Thai varieties are both okay)
1 Tbsp vegetable oil for stir frying
Fresh lime juice (optional)

*Note: if you use a rice cooker, start cooking your rice first.

In a small bowl, mix the fish sauce, soy sauce, and brown sugar.

Heat 1 tablespoon of vegetable oil in a nonstick skillet over medium heat and add the shallots. Cook the shallots until they are translucent and soft, about 3 minutes. Turn the heat up to medium high and add the chicken, bell peppers, grated ginger, minced garlic, ground pepper, and sliced chilies. Continue to stir fry until the chicken is nearly cooked through, about 2 minutes, then add the sauce. Cook for another minute and the sauce will thicken. Add more soy sauce or salt if you need to. Stir in the fresh basil at the end. Squeeze a little lime juice on top if you have some limes on hand. Serve over steamed rice.

Cold Soba

Soba
When exam crunch time rolls around, which is all too often, time is precious and there's very little of it that can be set aside to cook. Now, that's not to say I stop cooking all together, I just have to spend my time wisely. Anything that can be made in less than 30 minutes is good (as long as it's not remotely connected to Rachael Ray), less than 15 is ideal. Which brings me to one of my favorite meals, cold soba. It's simple, healthy, and delicious. I boil some noodles, make the dipping sauce while the noodles cook, and sprinkle some toasted sesame seeds, seaweed, sliced green onions on at the end to make it look pretty because pretty food keeps the morale up while studying. It can be cooked, slurped, and the dishes washed in under 30 minutes. And it's healthier than ramen, which will be a post for another day.

Buckwheat is high in protein, good for your cardiovascular system, and just does a lot of great things for your body. When you buy soba noodles, make sure to look at the ingredients list, and if buckwheat is not the first ingredient you see, don't buy it. Preferably, the noodles should be 100% buckwheat. Cheaper, low quality noodles often cut their buckwheat with yam or other ingredients. Cold soba is particularly refreshing after a night of heavy takeout. If I have more time to spare, I'll pan fry some tofu to add on top and make a cucumber salad for a more complete meal.

Like most people, I rarely have dashi stock just sitting in the fridge so I usually just use water. Or I cheat by simmering some bonito and seaweed with the soy sauce and mirin when I'm making the sauce, let sit for a few minutes, and strain. If you have chicken stock or vegetable stock that will work too.

Cold Soba
Serves 2

2 bunches of soba noodles

Soba sauce
2 Tbsp soy sauce
2 Tbsp mirin
1/2 tsp sugar (more to taste)
1/4 C Dashi stock (or chicken/vegetable stock or cheater dashi-see note)

Garnish
Toasted Seasame seeds
Sliced green onions
Seaweed slivers
Grated daikon

Boil water in a saucepan and cook the soba noodles according to package instructions.

While the noodles cook bring the ingredients for the sauce to a boil then remove from heat and set aside.

When the noodles are cooked, drain the soba noodles. Return them back to the pot and fill with cold water, swirl the noodles around, drain and repeat this process until the water is no longer starchy and cloudy. Put the drained noodles on a platter or bamboo tray. Top with whatever garnishes you want.

Pour a little sauce in a bowl, pick up some noodles, dunk in the sauce, and slurp to your heart's content.